Speedy Weeknight Baked Bell Pepper Egg Nests
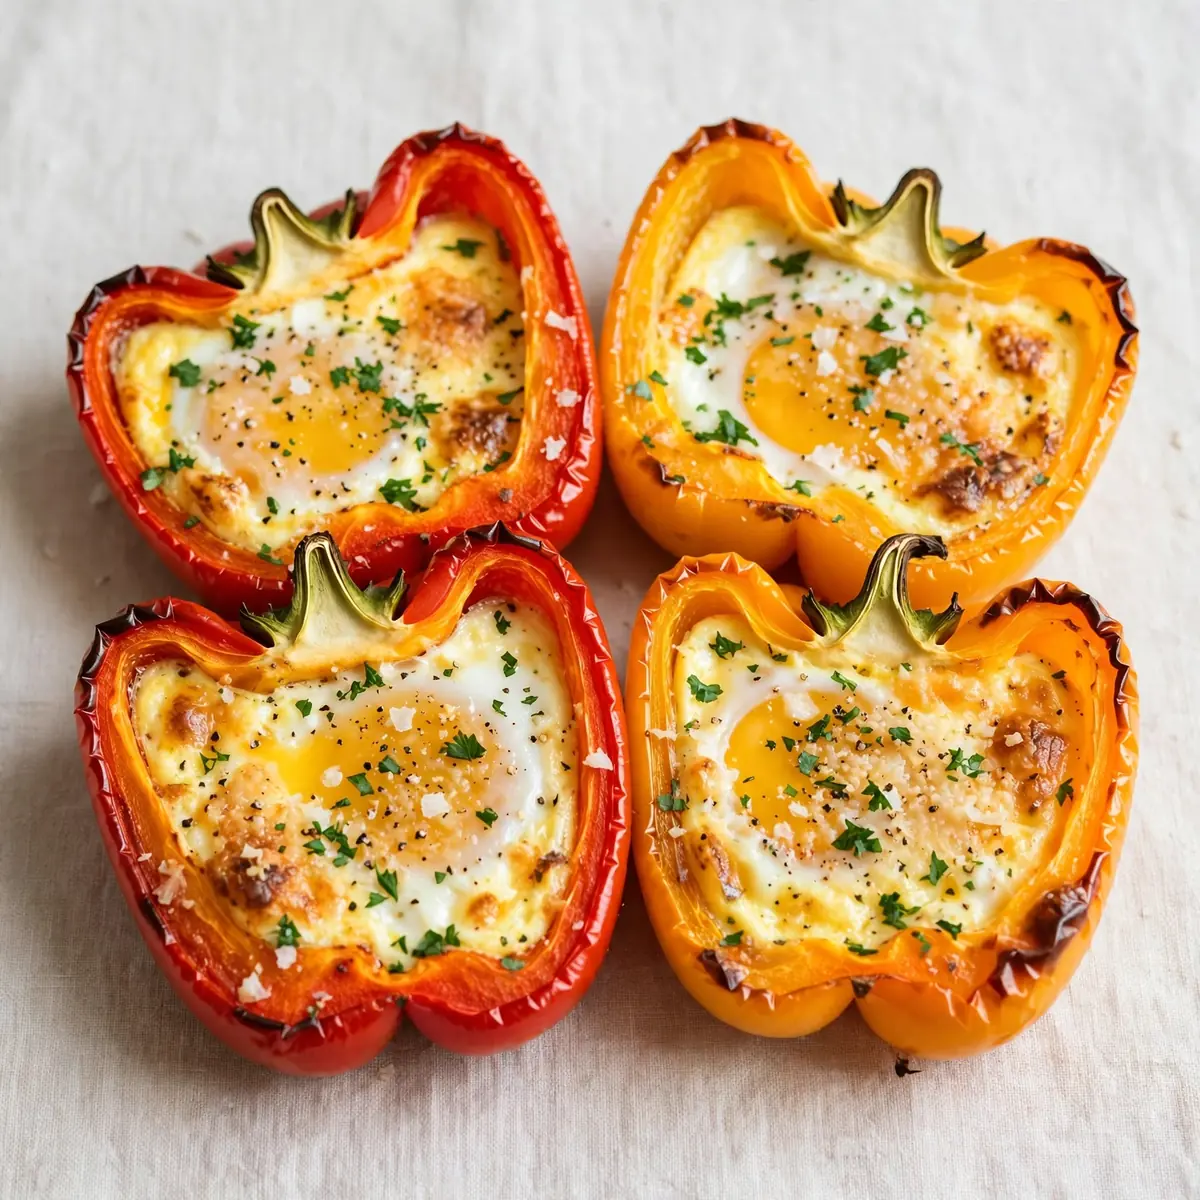
We’ve all been there — it’s 6pm, the kids are hungry, and the thought of a complicated dinner feels like a mountain to climb. That’s exactly why I created these Baked Bell Pepper Egg Nests; they’re a genuine lifesaver for those chaotic weeknights when you need something nourishing, delicious, and on the table in under 30 minutes with barely any washing up.
Recipe Overview
- Prep Time: 10 minutes
- Cook Time: 18-22 minutes
- Total Time: 30 minutes
- Servings: 4 (2 nests per person)
- Difficulty: Easy
Why You’ll Love This Baked Bell Pepper Egg Nests
- Ready in half an hour: From fridge to table in a flash, making it ideal for those frantic weekday evenings.
- One dish to wash: Everything bakes in a single tray, so you’re not left with a mountain of pots and pans.
- Picky-eater approved: My husband, who’s usually picky, asked for seconds! The mild, sweet pepper and runny yolk are a winning combination.
- Make-ahead magic: Prep the peppers in advance, and you’re just a crack of an egg away from dinner.
- Naturally filling: Packed with protein and vegetables, this meal keeps everyone satisfied without the mid-evening slump.

Ingredients You’ll Need
- 4 large bell peppers (any colour — red, yellow, or orange are sweetest)
- 8 large eggs
- 100g grated cheddar cheese
- 1 small red onion, finely diced
- 2 cloves garlic, minced
- 100g cherry tomatoes, halved
- 2 tablespoons olive oil
- 1 teaspoon smoked paprika
- ½ teaspoon sea salt
- ¼ teaspoon black pepper
- Small handful fresh chives or parsley, chopped (for garnish)
Tip: For the best flavour, choose bell peppers that are firm and have a vibrant colour. Red and yellow peppers are naturally sweeter, which balances the savoury egg beautifully.
How to Make Baked Bell Pepper Egg Nests
- Preheat and prepare the dish: Preheat your oven to 200°C (180°C fan) or Gas Mark 6. Lightly grease a 9×13 inch baking dish with a drizzle of olive oil. This ensures nothing sticks and makes cleanup even easier.
- Slice the peppers into rings: Wash the bell peppers, then cut off the tops and bottoms so you have flat ends. Slice each pepper crossways into 2 thick rings, about 2.5cm wide. Remove all seeds and white membranes. You should have 8 rings in total. The rings should stand upright on their own; if they wobble, trim the bottom flat.
- Sauté the aromatics: In a small mixing bowl, combine the diced red onion, minced garlic, halved cherry tomatoes, olive oil, smoked paprika, salt, and pepper. Stir well. This mixture will sit at the base of each pepper ring, adding a burst of flavour and moisture as it bakes. The smell of the smoked paprika will start to fill your kitchen — it’s wonderfully warm and inviting.
- Assemble the nests: Arrange the 8 pepper rings evenly in the prepared baking dish. Spoon a small amount of the onion-tomato mixture into the bottom of each ring, spreading it out so it covers the base. This creates a little cushion for the egg. You’ll notice the vibrant red and orange of the tomatoes against the bright green or red pepper — it’s already looking appetising.
- Crack the eggs: Carefully crack one egg into each pepper ring. Try to keep the yolk intact; if a bit of white spills over the side, it’s fine — it will just cook around the pepper. The yolk should sit proudly on top, a beautiful golden dome in the centre of the ring.
- Top with cheese and bake: Sprinkle the grated cheddar cheese evenly over the eggs and pepper rings. Place the dish in the preheated oven and bake for 18-22 minutes. After 15 minutes, start checking. You’re looking for the egg whites to be set and opaque, but the yolks should still be slightly jiggly when you gently shake the pan. The cheese will be melted and bubbly, with a few golden brown patches on top. The kitchen will smell of roasted peppers, melted cheese, and smoky paprika.
- Rest and garnish: Remove the dish from the oven and let it rest for 2 minutes. This allows the residual heat to finish setting the eggs without overcooking them. Sprinkle with fresh chives or parsley before serving. The bright green against the golden cheese and red pepper is a lovely touch.
Tips From My Kitchen
- Stabilise your pepper rings: If your pepper rings wobble, slice a tiny sliver off the bottom to create a flat, stable base. A wobbly ring will cause the egg to leak out, creating a mess instead of a neat nest. I used to struggle with this dish until I discovered this technique, and it made all the difference.
- Don’t skip the base layer: The sautéed onion and tomato mixture isn’t just for flavour — it also acts as a barrier. It prevents the egg from seeping under the pepper ring and sticking to the dish, ensuring each nest lifts out cleanly and looks beautiful on the plate.
- Use room temperature eggs: Cold eggs straight from the fridge take longer to cook and can lead to overcooked whites before the yolk is done. Let your eggs sit on the counter for 10-15 minutes before cracking them. The whites will set more evenly, and the yolk will stay gloriously runny.
- Make it ahead for busy mornings: You can slice the pepper rings and prepare the onion-tomato mixture up to two days in advance. Store them separately in airtight containers in the fridge. When you’re ready to cook, simply assemble and bake. This makes it perfect for a quick dinner after a long day.
- Watch your oven like a hawk: Oven temperatures vary wildly. Start checking at the 15-minute mark. The perfect nest has set whites but a yolk that still wobbles. If you like a firmer yolk, bake for 2-3 minutes longer, but be careful not to let the cheese burn. The visual cue is when the edges of the white turn from translucent to completely white and firm.
Equipment You’ll Need
- 9×13 inch baking dish
- Aluminium foil (for covering if you’re making ahead and want to reheat gently)
- Mixing bowls (small to medium)
- Sharp knife and chopping board
- Measuring spoons
Common Mistakes to Avoid
- Overcrowding the pan: If you pack too many pepper rings into the dish, they’ll touch and steam rather than roast. This leads to soggy peppers and unevenly cooked eggs. Leave at least 1cm of space between each ring so hot air can circulate, giving you perfectly roasted edges and set whites.
- Wrong temperature: Baking at too high a temperature will cause the eggs to rubberise and the cheese to burn before the peppers have softened. Stick to 200°C (180°C fan). If your oven runs hot, drop the temperature by 10°C and bake for a few minutes longer. The peppers should be tender when pierced with a fork, not charred.
- Skipping the rest time: I know it’s tempting to dive straight in, but those two minutes of resting are crucial. The eggs continue to cook from the residual heat of the dish, which sets them perfectly. If you skip this, you might end up with runny whites and a messy plate. Patience pays off here.
Delicious Variations to Try
- Spicy Version: Add a finely chopped red chilli to the onion-tomato mixture, or sprinkle a pinch of chilli flakes over the eggs before baking. For an extra kick, serve with a dollop of harissa paste on the side.
- Vegetarian/Vegan Option: For a vegan version, replace the eggs with a mixture of mashed firm tofu, nutritional yeast, and a pinch of kala namak (black salt) for that eggy flavour. Omit the cheese or use a plant-based alternative. The texture will be different but still delicious.
- Different Protein: Add some shredded cooked chicken or turkey into the base mixture before cracking in the eggs. This boosts the protein content and makes the dish even more substantial. For a meat-free protein boost, add a handful of cooked quinoa or lentils.
What to Serve With Baked Bell Pepper Egg Nests
- A simple side salad of rocket, spinach, and a light lemon vinaigrette.
- Buttered wholemeal toast or crusty sourdough for dipping into the runny yolk.
- Roasted cherry tomatoes and asparagus on the same tray, if you have room.
- A dollop of Greek yoghurt or labneh for extra creaminess.
Still hungry for ideas? You might also love Cozy Weekend Lemon Pepper Baked Salmon Project, High Protein Beef And Bell Pepper Stuffed Peppers from our sister kitchens.
Frequently Asked Questions
Baked Bell Pepper Egg Nests
Ingredients
Method
-
Preheat and prepare the dish: Preheat your oven to 200°C (180°C fan) or Gas Mark 6. Lightly grease a 9×13 inch baking dish with a drizzle of olive oil. This ensures nothing sticks and makes cleanup even easier.
-
Slice the peppers into rings: Wash the bell peppers, then cut off the tops and bottoms so you have flat ends. Slice each pepper crossways into 2 thick rings, about 2.5cm wide. Remove all seeds and white membranes. You should have 8 rings in total. The rings should stand upright on their own; if they wobble, trim the bottom flat.
-
Sauté the aromatics: In a small mixing bowl, combine the diced red onion, minced garlic, halved cherry tomatoes, olive oil, smoked paprika, salt, and pepper. Stir well. This mixture will sit at the base of each pepper ring, adding a burst of flavour and moisture as it bakes. The smell of the smoked paprika will start to fill your kitchen — it’s wonderfully warm and inviting.
-
Assemble the nests: Arrange the 8 pepper rings evenly in the prepared baking dish. Spoon a small amount of the onion-tomato mixture into the bottom of each ring, spreading it out so it covers the base. This creates a little cushion for the egg. You’ll notice the vibrant red and orange of the tomatoes against the bright green or red pepper — it’s already looking appetising.
-
Crack the eggs: Carefully crack one egg into each pepper ring. Try to keep the yolk intact; if a bit of white spills over the side, it’s fine — it will just cook around the pepper. The yolk should sit proudly on top, a beautiful golden dome in the centre of the ring.
-
Top with cheese and bake: Sprinkle the grated cheddar cheese evenly over the eggs and pepper rings. Place the dish in the preheated oven and bake for 18-22 minutes. After 15 minutes, start checking. You’re looking for the egg whites to be set and opaque, but the yolks should still be slightly jiggly when you gently shake the pan. The cheese will be melted and bubbly, with a few golden brown patches on top. The kitchen will smell of roasted peppers, melted cheese, and smoky paprika.
-
Rest and garnish: Remove the dish from the oven and let it rest for 2 minutes. This allows the residual heat to finish setting the eggs without overcooking them. Sprinkle with fresh chives or parsley before serving. The bright green against the golden cheese and red pepper is a lovely touch.
Notes
If you’re looking for another quick and satisfying dinner that keeps cleanup to a minimum, I highly recommend trying our One Pan Cilantro Lime Shrimp Skillet Cauli Rice — it’s another firm favourite in my household. For a different take on a protein-packed breakfast-for-dinner vibe, you might also enjoy Easy Keto Eggs Benedict With Turkey Bacon On Cloud Bread. And if you’re after more weeknight meal inspiration, be sure to browse our Dinner Recipes collection.
I’d love to hear how these Baked Bell Pepper Egg Nests worked out for your family. Drop a comment below to let me know if you tried any of the variations or if you have a tip of your own to share. Happy cooking, everyone!